Supplies Needed
1 tube of choice – I used the beautiful artwork of Amberly Berendson which can be purchased from My Tubed Art. You must have a license to use. F.Y.I – her ta-ta’s show. In this tutorial I show you how to cover them up.
My Template 190 here
Plugs Ins used:
Brush Strokes - Crosshatch
Brush Strokes - Crosshatch
Mura’s Meister – Copies
Animation Shop
“Sandy Toes & Salty Kisses” is a FTU scrap kit created by me, Bev, HorsePlay’s Pasture Designs. You can download it from my blog here.
This tutorial was written assuming you have working knowledge of PSP.
~♥~ Let’s get started ~♥~
Open up the template.
Shift + D.
Close out the original.
Delete the following layers:
Credit, LAYER 15, 14, 13, 12, 2, AND 1
Open up the tube.
Highlight the Image layer.
Copy.
Make the template active.
Highlight LAYER 4.
Click on it with your Magic Wand.
New Raster layer.
Paste the Image Into Selection.
Click the lock icon at the top of the layers pallet to lock the layer.
Adjust/Blur/Motion Blur:
Angle 180.00
Strength: 86%
OK
Click the lock at the top of the layers pallet to unlock the layer.
Copy.
Deselect.
Highlight LAYER 3.
Click on it with your Magic Wand.
New Raster layer.
Paste the paper Into Selection.
Deselect.
Delete template LAYERS 3 & 4.
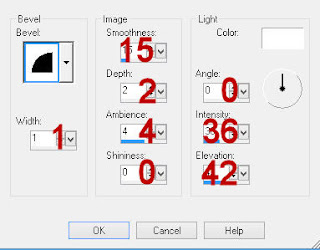
To each paper give it a slight Inner Bevel:
Highlight LAYER 5.
Click anywhere outside of the circle with your Magic Wand.
Selection/Invert
New Raster layer above LAYER 6.
Flood fill with #765d45.
Selections/Modify/Contract by 20.
OK
Tap the delete key.
Deselect.
Adjust/Add Remove Noise/Add Noise:
Gaussian and Monochrome checked
Noise: 8%
OK
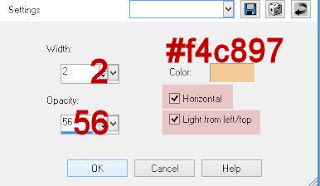
Apply Brush Strokes – Crosshatch:
Match your settings to mine –
Delete template LAYER 5.
Color Pallet:
Foreground: #a4c3d5
Background: #4EC0B9
Make your Color Replacer Tool active.
Highlight LAYER 6.
Double right click your mouse on it.
It should have turned a teal color.
We’ll come back to that layer in a while.
Color Pallet:
Foreground: #929cb5
Background: #568c68
Highlight LAYER 7.
Your Color Replacer Tool should still be active, double right click on the template.
Apply the same Crosshatch effect.
Repeat the above step with LAYER 8.
Color Pallet:
Foreground: #be8277
Background: #d1a373
Highlight LAYER 9.
Your Color Replacer Tool should still be active, double right click on the template.
Give it the same slight Inner Bevel effect.
Effects/Texture Effect/Blinds:
Match your settings to mine –
Color Pallet:
Foreground: #a4c3d5
Background: #765d45
Highlight LAYER 10.
Your Color Replacer Tool should still be active, double right click on the template.
Adjust/Add Remove Noise/Add Noise:
Use same settings
Make the tube active.
Highlight the Image layer.
Copy.
Make the template active.
Highlight LAYER 11.
Click on it with your Magic Wand.
New Raster layer.
Paste the Image Into Selection.
Click the lock icon at the top of your layers pallet to lock the layer.
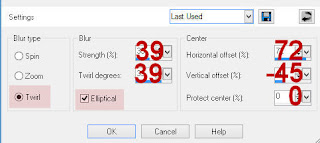
Adjust/Blur/Radial Blur:
Match your settings to mine –
Click the lock at the top of the layers pallet to unlock the layer.
Duplicate the layer.
Change the Properties to Soft Light.
Copy and paste the tube as a new layer over the paper.
Move it into position – see my tag for reference. (don’t worry about the ta-ta’s showing, you won’t be able to see them when the tag is finished).
Selections/Invert
Tap the delete key.
Deselect.
Change the Properties to Luminance (Legacy) and lower the Opacity to about 22.
DO NOT delete the template layer and be sure to leave it Open.
Copy and paste your tube as a new layer.
(I closed out all the layers accept for “Tube No Fix” and “feathered bottom and hands in w”, Copy/Merged and pasted it as a new layer on my tag)
Copy and paste Shell 1 as a new layer and position it over the right Ta-ta.
Duplicate the shell and position it over the left Ta-Ta.
Lower the Opacity of this shell so you can see through it.
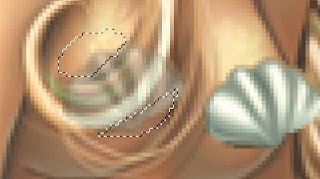
Use your Freehand Selection tool to section off the area you want to stay:
Selections/Invert
Tap the delete key.
Deselect.
Highlight the right Ta-Ta again. Make your Eraser Tool active set the size at about 17 and the hardness at about 15. Just barely erase to the edge of the right side of the shell, just to “blend”.
Merge the Shell layers and tube onto the same layer.
I resized the merged tube 90% and 95%.
Move into exact position – see my tag for reference.
Add your elements. I used:
El 2: Resize 60%
El 1: Resize 70%/Mirror
El 3: Resize 60%/Use Target Tool and change to this color: #74ae82. Duplicate/Mirror the element.
El 5: Change the color the same as the previous element. Duplicate/Mirror
El 10: Resize 25%/Change the color to #dac08f.
From the tube: Shell 1 & 2: Resize each 90% and 95%
Shell 1 (again): Resize 75%/Duplicate (use to place on each side of your name)
Copy and paste the tube Image as a new layer just about your white background. Resize 60%.
Apply Mura’s Meister – Copies
Choose Wallpaper (Rotate)
Use Default Settings
OK
Adjust/Blur/Gaussian Blur:
Radius: 10%
OK
Apply the mask.
Merge Group.
Duplicate/Change the Properties to Multiply.
Duplicate.
Add your copyrights.
If you’re not going to animate then add your name and save your tag.
Add your name.
Color Pallet:
Foreground: #765d45
Background: #88c4a8
Stroke: 1.0
Type your name.
Apply Brush Strokes – Crosshatch:
Use same settings.
Highlight LAYER 6 (the blue circle template layer you turned Teal).
Copy
~Time to Animate~
Open up Animation Shop.
Edit/Paste as New Animation.
Effects/Insert Image Effects:
If Underwater isn’t the effect showing, change it to that now.
When the frames are done rendering, click OK.
You should have 21 frames.
Highlight Frame 1.
Edit/Delete
Click on the View Animation icon at the top to view your tag so far:
Back in PSP
Close out all your layers.
Starting at the bottom of your layers pallet with the background layer, open all layers up to template LAYER 6 – (Include layer 6).
Copy Merged.
Carry into AS.
Edit/Paste as New Animation.
Hold down the Ctrl + Shift keys and press the letter L on your keyboard until you have 20 frames (the number of frames can be seen at the bottom left of your screen).
Make your water animation active.
Ctl + A (to highlight all the frames)
Edit/Copy
Make your tag frames active.
Ctrl + A (to highlight all frames)
Edit/Paste/Into Selected Frame – DO NOT MOVE YOUR MOUSE!! Just click it. The water anima will end up exactly where it needs to be…tada!
Click on the View Animation icon to view your tag so far.
Back in PSP.
Close out all the layers that are open and open up all the layers that are closed.
Copy Merged.
Carry into AS.
Edit/Paste as New Animation.
Edit/Copy
Click on the Propagation Paste Icon at the top of your screen:
Make your tag frames active.
Ctrl + A (to highlight them all)
Ctrl + E – position the frame exactly over the water. Once it’s in its exact position click your mouse.
View your animation.
If you like it then hit Ctrl + A (to highlight all frames)
Animation/Resize Animation:
Click Pixel Size:
Width: 500
OK
Save your animation.
I hope you enjoyed this tutorial as much as I did creating it.
I’d love to see your results.
Hugs,
Bev


No comments:
Post a Comment